

Managing Your HTC Smart Wi-Fi
Your HTC Smart Wi-Fi package will include Wireless Pods powered by Plume and access to Plume’s highly rated Plume HomeTM app.
Through the Plume Home app’s Performance, Connectivity, Security and Motion features, you’ll have access to parental controls, online protection for your devices, advanced smart home protection, adblocking, motion detection, and advanced Wi-Fi management tools.
Q: 1- Signing into the Plume Home App
Follow these 6 simple steps to sign into your account. Watch the video tutorial or Open/Download Infographic.
- After your HTC Smart Wi-Fi Pods have come online and are connected, download the Plume Home App
- Open the downloaded App and select “Sign In”.
- Enter your email address and click “Next”.
- Go to your email inbox and open the email from Plume Support. Click on the Verify Account Link.
- Select how you want to launch your Plume Home app (Just Once or Always).
- The Home Screen will open.
Over the next 24 hours, your new plume Wi-Fi Network will optimize, creating the best performance for your connected devices.
Q: 2- Getting better speed results with Plume Home
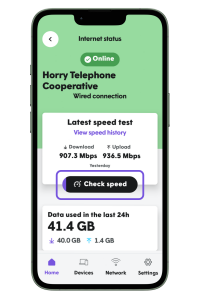 HOW TO RUN A SPEED TEST
- Click on “Horry Telephone Cooperative” below your home network name.
-
Click on “Check speed” to run the test. This will trigger a speed test on the gateway and after a few minutes, you’ll see the results. If the speed test fails, try again.
VIEWING SPEED HISTORY
You can check the history of all automatic and manual ISP speed tests performed on the network within the last 30 days. The results can be filtered for both download and upload results, and periods of 24 hours, 7, or 30 days.
Q: 3- Viewing or sharing wireless password
- Open the Network page.
- Tap on the “Passwords” tile to get to the passwords screen.
- The Password screen will display a list of passwords created for that Network name (SSID).
○ If it is a WPA2 SSID, use the Home, Guests, or Internet Only tabs to switch between the different types of passwords you have created.
- Tap on the “Share” icon on the password you want to share.
○ A QR code that can be scanned by another device with a built-in camera to join the network without entering a password is displayed.
○ The Share a link option on the QR code page offers other sharing methods based on the apps installed on the device. This method allows you to send a link to a web page with the Network name and password. The link generated will automatically expire after 24 hours.
Q: 4- Changing or disabling the wireless password
- Open the Network page and tap the “Passwords” tile.
- Choose the Home, Guest, or Internet-only tabs to bring up the appropriate list of passwords and select the password to be modified.
- Tap the “options” button next to the password you want to modify.
- In the pop-up menu, choose an option to modify the password.
○ Edit – Change the password, modify shared devices on guest passwords, or modify an expiry.
○ Disable – This option disables the password until you manually reenable it. (Only available for WPA2 passwords)
○ Delete – Completely remove the password for the Plume Home Wi-Fi network. (Only available for WPA2 passwords)
○ Enable – Reenables a previously disabled password.
5. If “Edit” is chosen, make the changes and tap on Save.
6. If “Disable” or “Delete” is chosen, tap on “Confirm”.
Any devices previously using the password before it was changed, disabled, or deleted, will be disconnected from the network.
Q: 5- Creating additional wireless passwords
Multiple passwords are automatically enabled if your network does not have 6GHz-capable hardware.
However, if you have 6GHz-capable hardware, your Plume Home Wi-Fi network may only have a WPA3 SSID and you’ll have to enable a WPA2 SSID as a secondary Wi-Fi network.
- Open the Settings page and tap on the “Network” tile.
- Tap on “Wi-Fi security” and turn the WPA2 toggle on.
- Tap on “View passwords” to create additional passwords for the WPA2 Wi-Fi network.
Q: 6- Setting up devices requiring a 2.4 GHz network connection
- Make sure you are using the same device to run both the setup application for the 2.4 GHz device you wish to connect to your network and the Plume Home (3.101 or later) app.
- Make sure your mobile phone is connected to your Plume Home network.
-
- Click on “Devices” at the bottom of your home screen
- In the Plume Home app, find your mobile phone and open its detail screen. It should be identifiable as the phone with the Plume logo.
- NOTE: If you do not see this logo on the phone, it is either not the one running the Plume Home app or it is not connected to the Plume Home network. Call Technical Support for assistance at 843.365.2186.
3. Tap on the “IoT onboarding mode” button. A new screen should pop up explaining the feature.
4. Tap on “Enable”. Your mobile phone will now be kicked off the network and should reconnect to your Plume Home network on 2.4 GHz.
5. The following screen will confirm when your mobile phone reconnects to 2.4GHz. The count-down timer displays how long it will stay connected to 2.4 GHz.
-
- If your phone does not reconnect to the Plume Home network, ensure it has not connected to another network. If it has, forget that network on your phone.
6. Open the app for the device you are trying to connect and complete the setup for all the devices. You should no longer get the “2.4 GHz networks only” error messages during the process.
7. Once you have completed the setup of the devices, go back to the Plume Home app tap on the “IoT onboarding mode” button again if needed, and then tap on “Disable”. Your phone should reconnect to 5 GHz within a few minutes.
Q: 7- Creating User Profiles
Adding people allows you to conveniently monitor and manage their Wi-Fi access.
 ADDING A PERSON
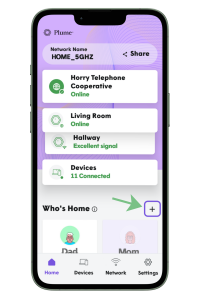 ADDING A PERSON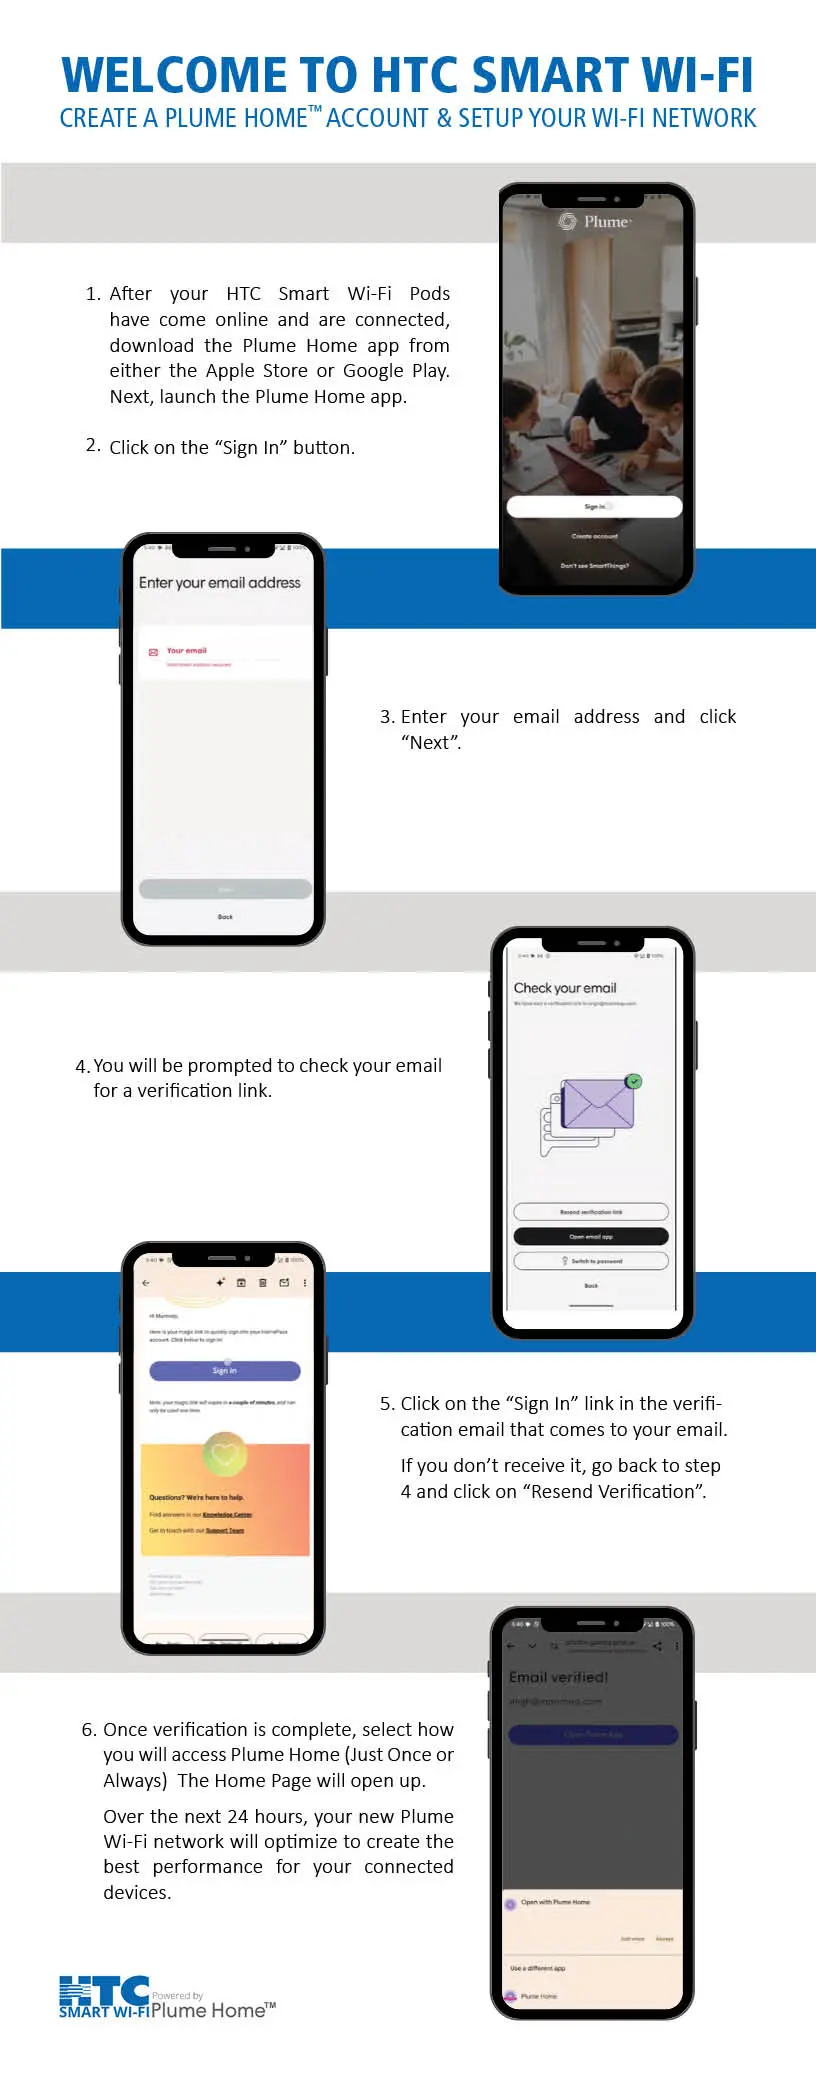
- Tap the “+” icon next to Who’s Home on the Main Screen.
- Tap on the placeholder image and follow the instructions to add a Profile image.
- Select your preferences for content filtering (restricted, moderate, light, or none).
- Tab on or off “Ad blocking, “Online defense” and Advanced IoT”
- If inviting a user,turn on the tab to “Invite to use the app”, add the email address and set permissions (read-only or full access).
- Finish setup by tapping “Add & invite”
Q: 8- Viewing and Management of devices on the network
Easily view and manage devices currently on your home network, as well as device connection history and devices on guest access.
- Open the “Network” or “Profiles” tab. Unassigned devices will also be listed on the Home dashboard.
- Select a device from the device details section of the “Network” or “Profiles” tab. If assigning from the home dashboard, drag a device card to a selected profile.
- Tap on “Assign to a Profile” from the device details in the Network screen. Or click the arrowed people icon to add or reassign a device from Profiles.
- Swipe or tap the ‘Skip” option to toggle through available device cards and then drag the chosen device into the Profile tile or tap “Assign”.
- To edit or unassign a device, tap on the ellipsis menu (. . .) in the “Network” or “Profiles” screens once a device is selected. This is where you can also edit a device name.
Q: 9- Enabling Parental Controls
This feature allows you to set content access rights for each profile or at the device level. You can also block or approve websites.
- A Focus can be created from the home dashboard if there are none active, or from within the Profiles page.
- To create a new Focus, start by pressing the “+” button on the Profiles page.
- Start by naming your Focus and select the devices or profiles that will be included, then tap the “Next” button.
- On the following screen, select either “All” or custom tile options. “All” will disable internet access entirely, while custom options allow specific app categories (e.g., social networking) or individual applications (e.g., Facebook) to be paused.
- If proceeding with a custom Focus, select the desired categories or individual apps, then press “Next” to proceed.
- You must now schedule your Focus to be one-time, recurring, or indefinite. Select a start and end date for one-time or recurring Focuses. An indefinite Focus will remain active until you deactivate it.
- Select the applicable days of the week for a one-time or recurring Focus. Once completed, tap “Create” and the Focus will be activated based on these settings.
Q: 10- How to enable and use Motion Detection
Features Include
- Live View – Take a look inside your network to see where the motion is currently happening.
- Motion Alerts – Receive push notifications when motion takes place, based on when people are at home.
- Motion History – View 24h or 7 days of the history of motion in your home.
- Personalization – Settings can be customized to fit you, your family, and your home, including motion sensitivity, pet mode, motion alert frequency, and where motion detection is tracked in your home.
How to Enable
- Open the Settings page and tap on the “Notifications” tile.
- Turn the “Motion” toggle on. The toggle will only appear if motion detection is enabled.
- Choose the Time between alerts. This sets the minimum interval option (5 minutes, 10 minutes, 30 minutes, or 1 hour) between notifications when motion is detected.
Assigning a Primary Device
Each member of the household can have a primary device assigned to their profile. This device will be used to determine when you are at home or away based on when the device connects or disconnects from the network.
Understanding Motion Data
Different colors will appear in your Motion Data based on your settings and activity. The degree of transparency represents the intensity of motion at the time.
- Blue – Motion was detected, but people are home
- Red – Motion was detected and everyone is away. Motion alerts would have been sent during this time.
- Gray – Motion detection was disabled.
Q: 11- Modify or enabling security settings for the network
Advanced security allows real-time protection against cyberthreats. Plus, you can control which security features are enabled.
-
- Online Defense – activates a real-time protection against ransomware, malware, and more
- Advanced IoT Protection – protects your network and connected devices against hackers and cyber criminals
- Ad Blocking– blocks loading of web and video ads
- Content Filtering – allows you to restrict the type of internet content accessible while connected to Plume Home
- Open the Settings page and tap on the “Security” tile.
- Tap on Remote access.
- In the pop-up menu, choose your level of protection:
-
- Block all – All incoming connections are automatically blocked until you manually approve them
- Block only high risk – Only incoming connections considered as high risk will be automatically blocked
- Disable – This disables Remote access protection allowing incoming connection
Q: 12- Traffic or Home Security Boost
Traffic Boost
- Tap the “Traffic Boost” icon from the Home dashboard or under the Network page.
- Tap the “Apps” header tile to boost specific categories or individual apps or select Profiles to boost specific profiles and their assigned devices. It is also possible to prioritize a single device.
- Select a time limit of 3 hours, 6 hours, or until the end of the day. You will see this change reflected in the Traffic Boost title cards in the Home dashboard and Network pages.
Home Security Boost
- From the Settings page, tap the “Security” tile.
- Enable the toggle for Home Security Boost, which will activate once all primary assigned devices have left the home.
Q: 13- Rebooting Your Smart Wi-Fi Device
Every now and then you will need to reboot your HTC Smart Wi-Fi to get the system back online. This quick tutorial show you what to do.
Q: 14- Sign up for HTC Smart Wi-Fi
Call our Contact Center at 843.365.2154 or toll free at 800.824.6779
Hours of Operation:
Monday-Friday from 8am – 8pm
Saturday from 8am – 6pm EST.
Ask how HTC Smart Wi-Fi will work in your home.