

DVR Management
Get the most from your DVR and never miss your favorite program (or programs) again.
Q: Why does my DVR stop recording before the end of the program?
The recordings on your DVR are managed by the time showing on the guide. The guide uses GMT (Greenwich Means Time) and should correspond with the time shown on the GMT official site. The time on our guide/info bar should be within a second of the Greenwich Means Time.
The time on the front of the box may be 10-15 seconds slower than GMT, but because that is a hardware setting only and the recordings are managed by the time on the guide, that will not affect your recording.
Some networks may not use GMT, therefore causing their programming to run longer than the allotted time on your guide. The DVR will stop recording when the guide shows the allotted timeframe has been reached, even if the program is still running.
While HTC cannot control the time that the networks use, we do have an option for our users. How to extend recording time:
- Press the Menu button on the remote
- Highlight the DVR option and press the OK button on the remote
- Highlight the Future Recordings option and press the OK button on the remote
- Arrow down or to the right to highlight the name of the recording you wish to modify and press the OK button on the remote
- Highlight the Red Dot, to set or cancel a recording, and press the OK button on the remote
- Highlight Modify Recording Settings and press OK on the remote
- Highlight View All Settings and press OK on the remote
- Highlight the Stop Recording option and press the right arrow button once for “1 minute late”, twice for “2 minutes late”, etc.
- Move down to highlight Record With These Settings and press the OK button on the remote
Q: How do I control Live TV?
Control live TV with a DVR. When tuned to a channel, the DVR automatically starts a temporary recording of the program. The arrow buttons on the remote allow a user to pause, resume and replay live TV without having to set up a recording.
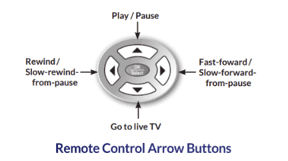
The arrow buttons are also used to control content recorded on the DVR.
- Pause: Pause live TV by pressing the up-arrow button (
 ) on the remote control.
 - Play: Press the up-arrow button () again to resume program playback.
- Rewind / slow-rewind from pause: Press the left-arrow button () to rewind — or to slow-motion rewind from a pause.
- Fast-forward / slow-forward from pause: Press the right-arrow button () to fast forward — or to slow-motion forward from a pause.
- Live TV recording : not permanent, unless the user saves it to the DVR hard disk drive.
 ) on the remote control.
  ) to rewind — or to slow-motion rewind from a pause.
  ) to fast forward — or to slow-motion forward from a pause.
A live recording is erased when the user does any of the following:
- Turn off the DVR.
- Change channels.
- Watch more than 90 minutes of the same channel. The DVR buffers only the most recent 90 minutes.
Q: How do I record live TV or schedule a series recording?
There are several different ways to set recordings on the DVR.
Method 1: One Touch Record
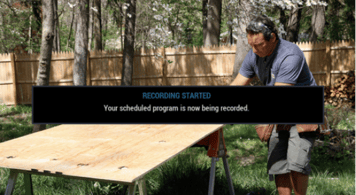
Record or schedule a recording just by hitting the REC  button on the remote. Press REC to:
- Save the recording of the program being viewed.
- Schedule the recording of a program selected in the Guide or Mini Guide.
- Schedule the recording of a program selected in Search results.
- Follow any on-screen prompts for recording settings.
Method 2: Record from the program info screen
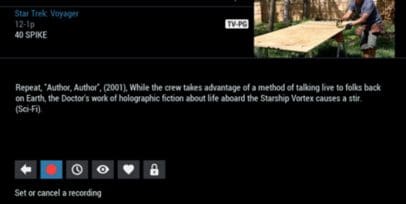
Use the  icon to:
- Record a program
- Schedule a recording
- Cancel or modify a scheduled recording
Select the icon and follow the on-screen prompts for additional options, as shown below.
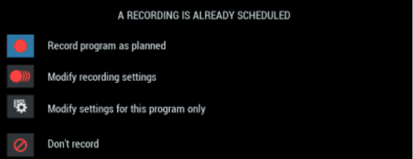
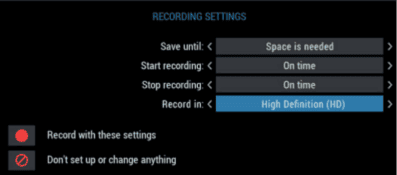
Recording settings
Set or modify recording options when scheduling a recording. To make changes, select from these options:
- Select to skip or cancel recording.
- Select to change the recording options:
- Save until: Whether to delete the recording when space is low.
- Start recording: When to start recording.
- Stop recording: When to stop recording.
- Select to set up or modify a series recording. This option appears for episodes in a series.
- Select to record the program with the current settings.
 to skip or cancel recording.
  to change the recording options:
Method 3: Set a manual recording
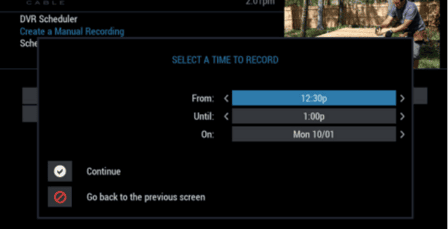
To set a manual recording for a specific time or channel:
- Select DVR from the Quick Menu or Main Menu.
- Select Set a Recording.
- Select the start time, end time, and day.
- Select Continue.
- From the channel list, select the channel to record.
- Select the icon to set options for a repeating recording.
- Select the Record icon to schedule the recording.
 Continue.
Method 4: Record a Series Recording
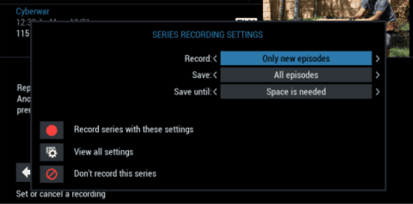
A series recording is identified in the Guide by the  icon. To set a series recording:
- Use the arrow keys () to choose the settings needed.
- Select the icon to review other settings, shown in the next panel.
- Select the icon to record with those settings.

 ) to choose the settings needed.
Series Recording Settings
Select the icon shown above to review all settings for a series recording:
- Record: Which episodes to record.
- Save: How many episodes to save.
- Save until: Whether to delete saved episodes when space is low.
- Record programs on: Channels to record.
- Start recording: When to start recording.
- Stop recording: When to stop recording.
Q: How do I modify recording options?
Select Future Recordings from the DVR menu to modify settings of scheduled recordings.

- Select DVR from the Quick Menu or Main Menu.
- From the DVR menu, select Future Recordings.
- Use the arrow keys () to scroll to another date.
- Use the arrow keys () to move to a scheduled recording.
- Select (press OK/Select) a scheduled recording to modify.
- On the program information screen, select .
Select an option:
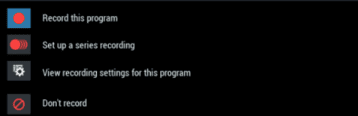
- Select to set up a series recording or to modify settings for a series recording.
- Select to modify settings for the recording on that date and time.
- Select to cancel the scheduled recording.
- Select to keep the current options and go back to the program information screen.
Recording options for a one-time program.
Recording options for a series.
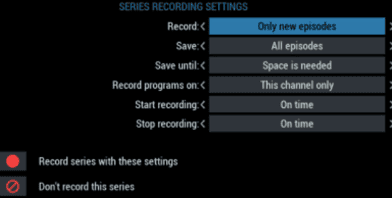
- Use the arrow keys ( ) to set the desired options:
- Record: Which episodes to record in a series.
- Save: How many episodes to save in a series.
- Save until: Whether to delete recordings when space is low.
- Record programs on: Channels to record.
- Start recording: When to start recording.
- Stop recording: When to stop recording.
- Select to record with those settings or to cancel the recording.
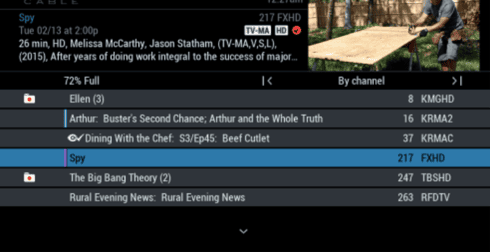
- Press the LIST button on the remote control
- Or, from the Quick Menu or Main Menu:
- Select DVR.
- Then select My Recordings.
- Use the arrow keys () to re-sort the list by title, date, or channel.
- Use the arrow keys () to move to a series or show.
- The icon indicates a folder for a series.
- Select the folder to view the list of recorded episodes.
- The icon indicates a watched or partially watched show.
- Select a show (press OK/Select).
 icon indicates a folder for a series.
  icon indicates a watched or partially watched show.
Select the action to be performed

- Select to play the show.
- Select to restart the show.
- Select to modify the Save Until setting.
- Select to delete the recording.
- Select to set or remove a parental lock on the show.
- Select to view future recording times for the show.
 to play the show.
  to restart the show.
  to modify the Save Until setting.
  to delete the recording.
  to set or remove a parental lock on the show.
  to view future recording times for the show.